WordPress教程
WordPress如何在后台文章列表编辑特色图像
我们在使用 WordPress 系统建站的过程中,会发现 WordPress 允许我们为每篇文章设置“特色图片”,也就是通常所说的缩略图,但是默认情况下我们只能够在文章编辑页面进行设置,但是有时我们需要在后台文章列表中添加、更改或者删除特色图片,如果能实现这个功能我想就大大的方便我们管理文章了。
我们就向大家推荐一款好用的 WordPress 插件 – Easy Thumbnail Switcher,这款 WordPress 插件可以让我们直接在后台文章列表中添加、更改或者删除特色图片,非常的方便。在后台的插件中搜索 Easy Thumbnail Switcher,在线安装或者点击此处下载 Easy Thumbnail Switcher 插件,上传到服务器空间激活即可。
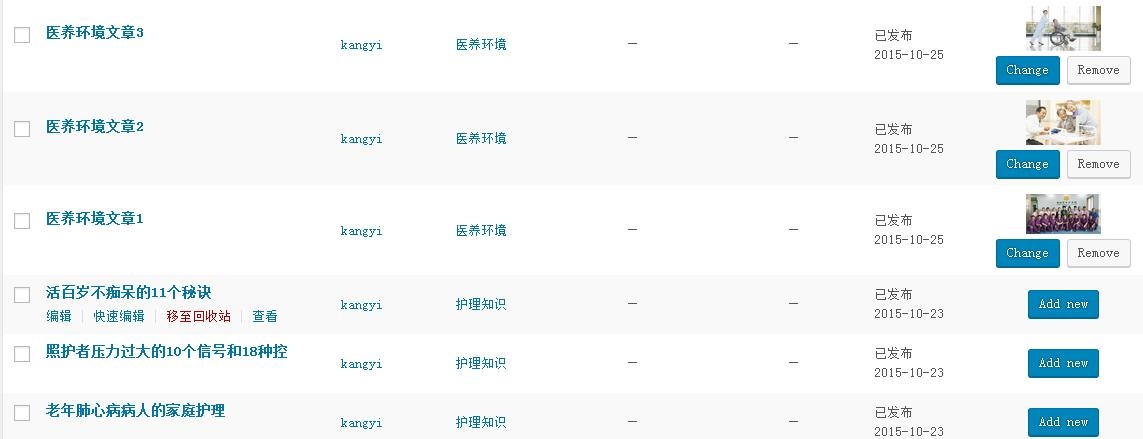
感兴趣的朋友可以下载此款 WordPress 插件安装测试一下。

如果您不需要使用插件,那么今天我们再分享一个使用代码方式实现这种功能,具体效果如下图所示:
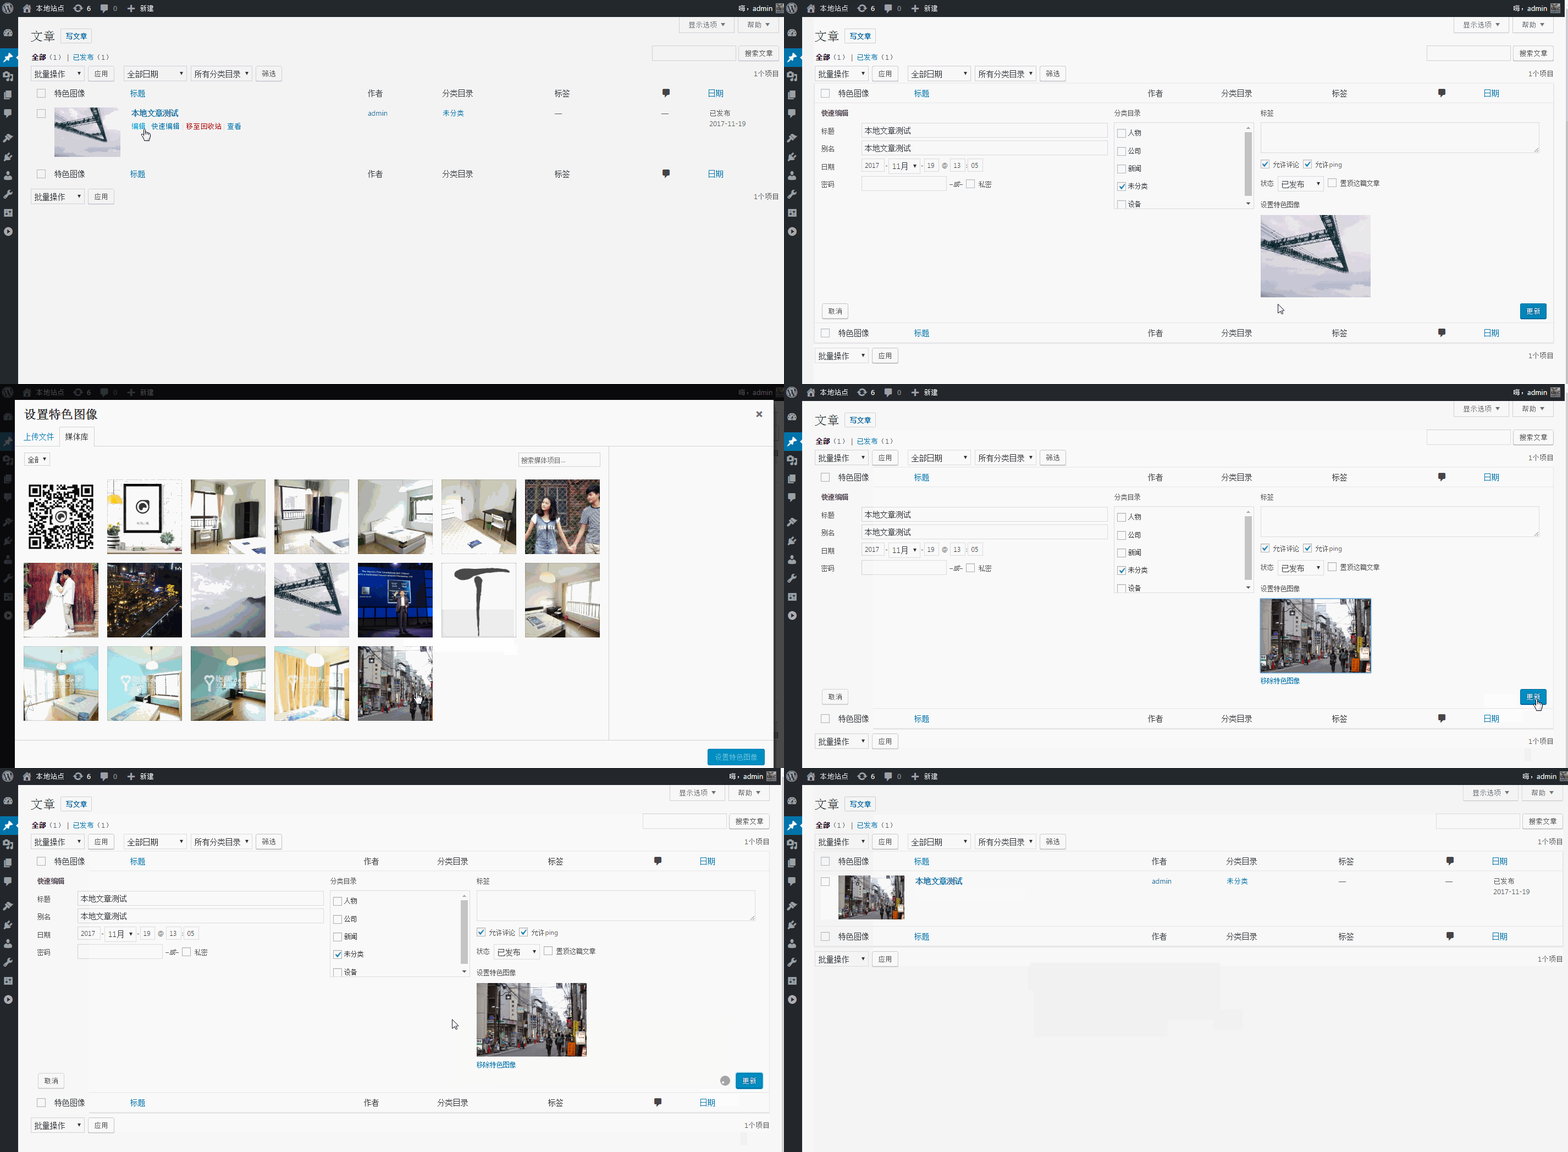
这是一个非常实用的功能,它能使我们在 WordPress 后台编辑文章时方便很多。如果你的主题不支持缩略图请首先在 functions.php 中添加:
add_theme_support( 'post-thumbnails' );
首先我们在后台文章列表添加数组,复制下面的代码到你的 functions.php 中:
/** 添加数组到文章列表*/add_filter('manage_post_posts_columns', 'lb_featured_image_column');
function lb_featured_image_column( $column_array ) {
$column_array = array_slice( $column_array, 0, 1, true )
+ array('featured_image' => '特色图像')
+ array_slice( $column_array, 1, NULL, true );
return $column_array;
}/** 使用钩子完善数组*/add_action('manage_posts_custom_column', 'lb_render_the_column', 10, 2);
function lb_render_the_column( $column_name, $post_id ) {
if( $column_name == 'featured_image' ) {
if( has_post_thumbnail( $post_id ) ) {
$thumb_id = get_post_thumbnail_id( $post_id );
echo '<img data-id="' . $thumb_id . '" src="' . wp_get_attachment_url( $thumb_id ) . '" />';
} else {
echo '<img data-id="-1" src="' . get_stylesheet_directory_uri() . '/placeholder.png" />';
}}}
然后,我们添加一些 CSS 样式来美化数组:
add_action( 'admin_head', 'lb_custom_css' );
function lb_custom_css(){
echo '<style>
#featured_image{width:120px;}td.featured_image.column-featured_image img{max-width: 100%;height: auto;}/* some styles to make Quick Edit meny beautiful */#lb_featured_image .title{margin-top:10px;display:block;}#lb_featured_image a.lb_upload_featured_image{display:inline-block;margin:10px 0 0;}#lb_featured_image img{display:block;max-width:200px !important;height:auto;}#lb_featured_image .lb_remove_featured_image{display:none;}</style>';
完成以上步骤后,在后台文章就可以查看效果了。

接下来添加 JS 代码使特色图像可以快速编辑和更新,首先排队加载 WordPress 默认上传:
add_action( 'admin_enqueue_scripts', 'lb_include_myuploadscript' );
function lb_include_myuploadscript() {
if ( ! did_action( 'wp_enqueue_media' ) ) {
wp_enqueue_media();
}}
然后在后台文章页面添加快速编辑字段:
add_action('quick_edit_custom_box', 'lb_add_featured_image_quick_edit', 10, 2);
function lb_add_featured_image_quick_edit( $column_name, $post_type ) {
if ($column_name != 'featured_image') return;
echo '<fieldset id="lb_featured_image" class="inline-edit-col-left">
<div class="inline-edit-col"><span class="title">特色图像</span><div><a href="#" rel="external nofollow" rel="external nofollow" class="lb_upload_featured_image">设置特色图像</a><input type="hidden" name="_thumbnail_id" value="" /></div><a href="#" rel="external nofollow" rel="external nofollow" class="lb_remove_featured_image">移除特色图像</a></div></fieldset>';
}
最后就是更新保存了,添加下面代码即可。
add_action('admin_footer', 'lb_quick_edit_js_update');function lb_quick_edit_js_update() {global $current_screen;
if (($current_screen->id != 'edit-post') || ($current_screen->post_type != 'post'))
return;
?><script>
jQuery(function($){$('body').on('click', '.lb_upload_featured_image', function(e){e.preventDefault();
var button = $(this),
custom_uploader = wp.media({title: '设置特色图像',
library : { type : 'image' },button: { text: '设置特色图像' },}).on('select', function() {var attachment = custom_uploader.state().get('selection').first().toJSON();$(button).html('<img src="' + attachment.url + '" />').next().val(attachment.id).parent().next().show();}).open();
});
$('body').on('click', '.lb_remove_featured_image', function(){$(this).hide().prev().val('-1').prev().html('设置特色图像');return false;
});
var $wp_inline_edit = inlineEditPost.edit;
inlineEditPost.edit = function( id ) {$wp_inline_edit.apply( this, arguments );
var $post_id = 0;
if ( typeof( id ) == 'object' ) {$post_id = parseInt( this.getId( id ) );
}
if ( $post_id > 0 ) {var $edit_row = $( '#edit-' + $post_id ),
$post_row = $( '#post-' + $post_id ),
$featured_image = $( '.column-featured_image', $post_row ).html(),
$featured_image_id = $( '.column-featured_image', $post_row ).find('img').attr('data-id');if( $featured_image_id != -1 ) {$( ':input[name="_thumbnail_id"]', $edit_row ).val( $featured_image_id ); // ID
$( '.lb_upload_featured_image', $edit_row ).html( $featured_image ); // 图像 HTML
$( '.lb_remove_featured_image', $edit_row ).show(); // 移除链接
}
}
}
});
</script>
<?php}
上面我们介绍了两种实现方法,各有千秋喜欢那种就使用那种,使用 WordPress 的原则就是能不使用插件就尽量不要使用插件,动动手不妨学习一下。
专业提供WordPress主题安装、深度汉化、加速优化等各类网站建设服务,详询在线客服!



 PetitQ